modules

piątek, 12 października 2012

Prestashop and facebook integration: shop in facebook fanpage tab

Today i want to write about presta and fcb integration module, and how to add own shop to our facebook fanpage!

Facebook Shop module for PrestaShop is the best and the most effective PrestaShop module, for integrate your shop with your Facebook Fanpage. This solution is not only a module but also a reliable application on Facebook that allows you to easily install the shop tab! In this way you will not have to create a new application. Just click, and use this great social media tool.


PrestaShop facebook shop tab

you can check demo version of this module, and you will se how does this feature work"


środa, 10 października 2012

How to turn on error reporting in PrestShop ?

This article is copied from: How to turn on error log / error reporting in PrestaShop ?

In this article you will read something about debuging modules and other shop problems. This article should be taken as an introduction to self-troubleshooting in the own store. This tutorial works in all versions of prestashop, in 1.5 too.

Turning error reporting on in PrestaShop:

By default, in PrestaShop this feature is disabled for safety reasons. Here is how to turn on PHP errors in shops based on PrestaShop:


Open and edit config.inc.php file

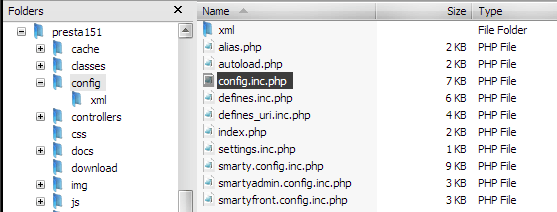
You first need to find the config.inc.php file in directory config in your main prestashop dir, exactly as we show on image below:


you must open this file and edit one setting parameter:

@ini_set('display_errors', 'off');

As you probably see and as we say, the display_errors value is set to off by default. You must turn it on. How to do that? just change it to:

@ini_set('display_errors', 'E_ALL');

and save the config.inc.php file. Thats all!


Did you know that display_errors parameter can have other values? Read more in official article about turning on error reporting in prestashop


środa, 19 września 2012

How to input html, css, javascript code into my PrestaShop site?

In this article i will write about adding html, css, javascript and other "client side" code into any place in our shop. Of course you can do it manually by editing template .tpl files of your shop theme. However, this method can be a bit annoying and difficult for users without a basic knowledge of programming languages ​​and smarty. In this short article i want to describe free module for adding html, css, javascript code in Prestashop.


Module is called HTML BOX and you can download it for free from MyPresta.eu website
Usage of this module is very simple. Just download and install this module in your prestashop back office. Then you must go to configuration site of this module and select place, where you want to input html, css, javascript, other code. Exactly as we checked on image attached below:

Html box configuration

as you see, you can check one position from many front-office hook list.
  • You can display your code in:
  • Header section of your shop
  • Top section of your shop
  • Left collumn of your shop
  • Right collumn of your shop
  • footer section of your shop
  • and home section of your shop

We checked left collumn. 


Text box window near hook list is place, where you put the code you want to dispaly. It could be any widget from other sites such like facebook, twitter, pinterest etc. So, put the code there and save settings of this module. Now you can refresh your shop page. You will see the new code exactly there, where you want and checked in module options.


niedziela, 16 września 2012

Prestashop 1.5 is now available!


Prestashop 1.5 new features

Multistore management
  • With options for multiple currencies, multiple languages and multiple domains, multistore management is complete, efficient and integrated into PrestaShop v1.5.  This new feature will allow any merchant, regardless of business size, to manage multiple stores from a single Back Office.
Cart-pricing rules
  • PrestaShop v1.5 allows you to manage your cart’s pricing rules easily through an ergonomic interface. Additionally, merchants can now provide discounts on any and all items in a customers’ cart. This feature provides an overtly-efficient way to market promotional offers upon checkout.
New modules API
  • For new APIs, the structure has been revised to help you simply and efficiently manage updates to all of your modules. The APIs will now automatically check to ensure you always have the latest version(s) of each module installed into your Back Office.
Rewritten Core
  • PrestaShop’s core software has been rewritten to meet the MVC pattern and the object paradigm. This will make it even easier for all developers using PrestaShop.
Redesigned Back Office
  • With an improved ergonomic Back Office and an updated graphical layout, PrestaShop’s new Back Office design is visually stunning and very easy to use. The redesign respects the MVC pattern to allow developers to quickly make customizations, if needed.

(Check out the new Back Office design)
Editing commands in Back Office
  • The editing commands in the Back Office have been optimized and relaxed. You will now be able to modify customers’ shopping carts as well as products already ordered. You will also be able to place orders from the back office, allowing you to help customers make purchases on your site (i.e. when they contact you by phone).
Improved Front Office Design and Functionality
  • The customer experience has been improved, including the order and checkout processes.  Merchants will now also be able to offer comprehensive product descriptions on a homepage that has been reimagined, and rebuilt from the ground up.

(New default template)
Improved After-Sales Service                                           
  • The integrated customer service feature has been greatly improved to centralize all of your customers’ messages from multiple sources. This new feature allows you to sync all of your email accounts so you can view and send messages directly from your Back Office.
Improved inventory management, supply orders, product returns and partial deliveries
  • For greater efficiency, PrestaShop will now include an inventory management tool allowing you to discern your physical stock from available quantities. In v1.5, you will now be able to manage your inventory in various warehouses, generate supply orders and view your stock through clear and specific interfaces. This inventory management tool is natively compatible with the new multistore feature, so managing your entire catalog of products has never been easier. Finally, for flexibility in managing customer orders, partial deliveries will now be available.
Improved management of downloadable products                
  • We have made selling downloadable products (photos, music, computer files, etc…) easier. You will now be able to manage product variations and create packages of multiple downloadable products. The file upload process has also improved.
In addition to the features provided above, multiple delivery addresses are now available. This way, if a customer chooses to shop for Christmas, or some other big event, they can buy multiple products at once and ship them individually to family and friends all over the world.
Several new partner modules have also been added as native features inside PrestaShop v1.5′s source code.

czwartek, 13 września 2012

How to add Facebook like box plugin to PrestaShop?

Now we write step-by-step tutorial about adding Facebook Like Box plugin into the PrestaShop based web store - exactly as we say in the previous post about paid Facebook integration: Like Box Prestashop Modules.

In this tutorial you will read how to create Facebook Like Box plugin code and something about adding procedure to your shop. Please note that to do it yourself you will need a minimum knowledge of managing files on the ftp server. But I think that the issue is simple and anyone can do it yourself. So let's go!


Maybe you want also great facebook shop tab?
The best Facebook Shop module for Prestashop - now 40€ cheaper!

Select place where we want to add Facebook Like Box Plugin in PrestaShop

As we say in previous post we want to add Like Box Plugin into right collumn of our shop. We of course  can add this awesome plugin wherever we want, but that is a topic for a completely separate article ;). 
On image attached below we pointed on red area where we want to put Facebook Input Box Plugin.


If we want to change our PrestaShop template, it is important to turn on "force compile" in PrestaShop preferences. Basically "force compile" is related to programming languages (in this case for php and smarty solution). If you turn on force compile in PrestaShop back-office - the script will rebuild your shop template on every time you enter or refresh shop page. It's important, because without "force compile" changes will not appear! Remember to turn off "force compile" after doing work. If you don't know where you can turn of "force compile": login into you PrestaShop back office go to Preferences tab, next to performance tab. You will see:


To turn on check "Force compile:" setting to yes. Ok, so now you can edit shop template files.

Editing PrestaShop template file for Facebook Like Box Plugin

If we want to add Like Box Plugin into right collumn of our shop, edit shop template file named footer.tpl. You can find it here: 

prestashop_directory/themes/your_theme/footer.tpl

Where:
prestashop_directory is directory where you prestashop is installed
your_theme is a shop template directory that is active in your shop


open file to edit with notepad or other text edior. We prefer to use a special HTML or PHP editor like notepad++ (windows) or geany (linux) or other free software. In this case we will show how to edit in simple  windows notepad. So, edit this file with notepad ;)


You footer.tpl file probably looks like file included below:


//HERE YOU WILL MUST IMPUT //PROPER LIKE BOX PLUGIN CODE {$HOOK_RIGHT_COLUMN}

How to get Facebook Like Box Plugin code?

go to http://developers.facebook.com/docs/reference/plugins/like-box/ page and fill Like Box setting form.


Available setting in form:

Facebook Page Url: The URL of the facebook page for like box
Width: the width of the like box plugin
Height: the height of the like box plugin
Color Scheme: The color scheme of the plugin. Note that the background is always transparent to match your background color. This setting changes the foreground colors to work well on light or 
Show Faces: Enable in you want to display profile photos of fans
Border Color: Border color of the like box plugin
Stream: Enable if you want to stream wall feed from your fan page
Header: Enable if you want to display "Find us on facebook" in header of Like Box

Click on Get Code button. Now you will se box with code for: HTML5, XFBML, IFRAME, URL. Select the IFRAME.


copy selected code to clipboard (ctrl+c)
and paste it for place:
//HERE YOU WILL MUST IMPUT //PROPER LIKE BOX PLUGIN CODE {$HOOK_RIGHT_COLUMN}
You footer.tpl section for displaing like box after paste like box code will looks like below:
{$HOOK_RIGHT_COLUMN}
As you probably see, in iframe we defined connection to Like Box Plugin url.

Attributes in Like Box Plugin url:

  • href - the URL of the Facebook Page for this Like Box
  • width - the width of the plugin in pixels. Default width: 300px.
  • height - the height of the plugin in pixels. The default height varies based on number of faces to display, and whether the stream is displayed. With the stream displayed, and 10 faces the default height is 556px. With no faces, and no stream the default height is 63px.
  • colorscheme - the color scheme for the plugin. Options: 'light', 'dark'
  • show_faces - specifies whether or not to display profile photos in the plugin. Default value: true.
  • stream - specifies whether to display a stream of the latest posts from the Page's wall
  • header - specifies whether to display the Facebook header at the top of the plugin.
  • border_color - the border color of the plugin.
  • force_wall - for Places, specifies whether the stream contains posts from the Place's wall or just checkins from friends. Default value: false.

Save your footer.tpl file and upload it into your PrestaShop correct template directory in ftp server. Refresh your website. Now you can see like box included into your shop page :)


You can also add this plugin in left column, footer section or in header section following this step-by-step tutorial. But there is main problem: how to add like box between Cart or specials Section?
It's a little bit harder and it's topic for another article.... If you want to put like box anywhere you want, use module: Facebook Like Box Pro module from official PrestaShop addons store, which costs 35,76 € with tax) or use module named Prestashop Facebook Like Box Plugin Module for about 14,00 € (this is price with tax).
środa, 12 września 2012

Facebook integration: Like Box Prestashop Module

Before I write something about adding like box plugin to your shop site I want to say a little bit about what exactly  is Facebook Like Box?


The Like Box is a social plugin that enables Facebook Page owners to attract and gain Likes from their own website. In our opinion this social media plugin from facebook is one from the most important thing in every shop based in PrestaShop engine.


The Like Box enables users to:
  • See how many users already like this Page, and which of their friends like it too
  • Read recent posts from the Page
  • Like the Page with one click, without needing to visit the Page

How to add facebook like box plugin to my PrestaShop?

You can add this great plugin in two ways:
  1. First way is use one from many available modules in oficial PrestaShop addons store. For example, here is the Facebook Like Box Pro module, which costs 29,90 € (price without tax, which mean that module costs 35,76 € with tax). You can also bought suchlike module named Prestashop Facebook Like Box module for about 14,00 € (this is price with tax).
  2. Second way means that you can add Like Box plugin manually. But in this is related to the necessity of knowing programming languages. I will write now how to add facebook like box plugin into your shop based on PrestaShop engine. For example, we will add like box plugin into right collumn of your shop.

    In the next article I will write step by step tutorial!


wtorek, 11 września 2012

Is my shop sending some informations to PrestaShop without my knowledge?

Unfortunately yes. But those informations  is only for improve PrestaShop system and statistical and demographical studies. Connecting and sending data process is completly anonymous and can be calssified into three categories:


  1. Automatic process which mean that PrestaShop receives basic information on the number of active stores, installed versions, domain names and the countries in which the software is used. These are used only for demographic data to help the PrestaShop team better understand the needs of the user community (e.g. number of shops using version 1.4, new countries using the software, etc.).
  2. Semi-Automatic process which mean that engine is sending informations during installation, PrestaShop pre-enables certain modules frequently requested by the community, such as Paypal and other shipping modules. At that time, you are given the option whether or not to accept the installation of these native features. If you do install them, our system sends you a single welcome email with advice on how to best use these modules to start selling online.
  3. Manual process which mean that sending datas is compared with your actions when you comes to manually updating your store, such as currencies, location packs and language packs. It is your responsibility as a PrestaShop merchant to choose whether or not to perform these updates and submit additional information to PrestaShop.com
And most important thing is that no personal information about you or your website is ever sent to PrestaShop, and by no means does PrestaShop ever have access to your catalog, customer base, turnover, statistics or the source code for your website. The anonymous connection between PrestaShop system and your store is only intended to provide the necessary data for the PrestaShop team to help us always improve our product, and to make changes to our software according to the expectations of the community.

So as you see: do not worry, everything with automatic data sending process is ok!

poniedziałek, 10 września 2012

Prestashop and Facebook integration: Facebook sales tab

Today i want write something about next module to integration your shop with facebook. I want to introduce you to Facebook sales tab module. Module is one of the most attractive way to advertise your offer on Facebook.

Prestashop and facebook integration: sales tab by http://mypresta.eu


Facebook sales tab is a PrestaShop module, which can increase the number of customer visits and boost your income. Our solution integrate your shop with Facebook Fan Page by adding a special "Sales" tab into it, where user gets completly list with products in sale from your shop based on PrestaShop engine. Check Prestashop Facebook sales tab demo.

How this Prestashop and Facebook integration works?


Prestashop and facebook integration: sales tab by http://mypresta.eu
Our module and Facebook application add automatically to your Fanpage on Facebook special tab, where users can find product in "Sale" From your shop. 


After clicking to "Sales" tab, user gets list of products in "sale". You can manage this page and configure it exactly as you want using module back office.


piątek, 7 września 2012

Prestashop and facebook integration: Coupons / voucher codes

Today i will write about integration your PrestaShop with your shop facebook fanpage account.
Integration will increase your income, because the main thing in our solution is generating voucher codes / discount codes for users which liked (click "like") your fanpage.

We want to recommend our module Facebook Fan Coupons


You can create you own Fanpage Tab with coupon generator in three steps:


1) first step: Install our application. Our dedicated application uses SSL certificate, so everyone who has "safe browsing" turned on on facebook can access your tab. This solution is important, cause if you want your own application you must buy SSL certificate which cost about 50 €. We give your access to our SSL certified domain for FREE. 

2) second step: Install our module in your shop. Install module Facebook Fan Coupons Tab in your PrestaShop back office. 

3) third step: Configure it as you want.

More information about module you can find here:

Prestashop Facebook Fan Coupon Tab


niedziela, 26 sierpnia 2012

How to reset Prestashop admin password


Reset Prestashop admin password

If you dont remeber your Prestashop admin password and you are still trying to log in into Prestashop back office without effects. This short paper is exactly for you. With this article you will know how to reset your Prestashop admin password. Read this step by step tutorial for reset Prestashop password.


1. Log in into your FTP account
For reset prestashop password you must be able to log in into your Prestashop FTP account. That's important because you'll need access to one file in Prestashop directory described in next step.

2. Check config/settings.inc.php file
Look in config/settings.inc.php file in your Prestashop directory and find out the _COOKIE_KEY_ value. This value in IT nomencalture is called as salt.

3. Log in into your PhpMyAdmin
You must have access to PhpMyAdmin or other database managment system. If you're logged in, try to run the following SQL code and replace the <> variables with values:
<_COOKIE_KEY_> that is salt value from config/settings.inc.php file described in step 2
<yourNewPassword> that is your new password value
<youremailaddress> that is your administrator email address, probably yours ;)

1
UPDATE employee SET passwd = md5(<_COOKIE_KEY_ value><yourNewPassword>) WHERE email =<youremailaddress>”;

That's all. Now you can login into prestashop backoffice.

This article is copied from: How to reset PrestaShop admin password


Prestashop Discount Generator module

sobota, 25 sierpnia 2012


All sites using PHP in CGI mode are affected and your shop can be hacked. All PrestaShop stores are not affected. If you don’t know how PHP is running on your shop, you should still apply this patch for security reasons. When PHP is used in a CGI wrapper, remote attackers may use this solution for command-line switches, such as -s, -d or -c, in a query string that will be passed to the PHP-CGI binary ...

You can read this article in: Prestashop modules and themes site

piątek, 24 sierpnia 2012

How to install modules in Prestashop ? Step-by-step tutorial

Ability to use modules in Prestashop are the most important thing. With the modules created by the Prestashop community (which mean community of normal users, agencies, developers, freelancers etc.) anyone, who use Prestashop e-commerce solution can exted store for new functionalities and features. Professional modules created by agencies or experienced developers are usually paid - you have a guarantee that the module was professionally executed and in compliance with applicable standards, safety rules and other important things in software developing. You can also get free modules, but you have no guarantee that everything will work correctly without compromising the safety of your store.

In this paper you will read about procedure of installing Prestashop modules. I hope, that this article will help you in understanding an essence of installing modules, and will be helply in your first steps with extending functionalities of shop based on Prestashop engine.

How to install prestashop module?

1) Log in into your shop
In first step you must login to your  Prestashop back-office. Remember, only user with granted privileges to access to the modules section can instal, configure and uninstall modules.  Make sure that you log in to the correct account. It would be best if you log in with an administrator account.  I hope, that you remeber your email and password used in installation process ;) 

prestashop backoffice login form by MyPresta.eu

2) Go to "Module" section
If you are already logged in into Prestashop backoffice correctly, now you can go to "Modules" section. Just click in "Modules" position in Administration tabs as we show on the picture below:

select Modules in your prestashop backoffice MyPresta.eu

3) Click on  " Add a new module Add a module from my computer"
In modules section you will see two buttons:  Add a new module Add a module from my computer   |    Add Add a module from PrestaShop addons. Below this two buttons you will see list of modules that are rolled up, by category. After clicking correct button, you will see two simple forms:


As you see, you can add modules in two ways. You can upload module from URL, and upload from your HDD (hard disc drive) or other physical disc.

3) Uploading and install module from URL
To upload module from URL you must have a valid link (URL) which goes to archive with packed module. Paste the correct link into "Module URL" input field and click "Download this module" button. For example we upload our Import vouchers from file in Prestashop module. As you see on image below, when everything is ok, you can find module using search tool. Just write first letters of module name and you will see full name of module in clickable tooltip:


Just click on it and go to 4 step for read about last "installing" procedure.

3) Uploading and install module from your HDD (hard disc drive)
If you downloaded any module into your HDD, you must upload it before you want to install it in your shop. Click on upload form and select correct file (packed) with your module. As in the previous case, we use our module for Importing Discount codes from file in Prestashop. After selecting module from your disc now you can click "Upload this module". Exactly as in previous case, you can find module using search tool. Just write first letters of module name and you will see full name of module in clickable tooltip:


Just click on it and go to 4 step for read about last "installing" procedure.

4) Installing module in your Prestashop
Now you can install module in your shop. This step is the last step in the Prestashop Installation procedure. After clicking on tooltip with your module, you can see new loaded page with your module on list:


On right side of table you can find "Install" button. Click on it to install your module. After that, and if with installation process is everything ok, and module works correctly - instalation is succesfull:


Now you can configure your module or Uninstall it if you don't want to use it. That's all, hope I will help you with this basic Prestashop training

wtorek, 21 sierpnia 2012

How to import livingsocial groupon etc. voucher codes in prestashop


Anyone, who has started an advertising campaign in own online store knows, that voucher codes are awesome tool for increase sales and income. Very often we want to organize actions in other webpages like livingsocial, groupon, mydeal etc. and we get listed special codes form this sites.  Customer after buying there some stuff gets one idividual code from voucher codes list. We must add all of listed vouchers to our shop system, but there is a little problem: what to do when there are hundred of codes on list?

How does it looks in Prestashop system?
In prestashop we can generate one voucher code per one request. It's problematic, because we spend much time in back office, only for adding voucher codes. Moreover, it is really tedious.  Simple measures say that the addition of about 100 discount codes with advanced specification take about 5 hours!  It's ridiculous to spend 5 hours on adding a discount code in prestashop back office. All of this is by the fact that we can't import voucher codes from files in Prestashop back office. But we create a special module:  Import Voucher from CSV  Our module can import a thousand codes listed in some file (CSV or other).

Ok, so how to import many voucher codes in prestashop?
First we need to describe the basic functionality of this module. Module Import Voucher Codes form CSV  is the simplest and quickest way to add as many voucher codes from CSV file as you want by one mouse click! Import Vouchers From CSV module saves your time which you can spend to make more money. If you want this module, go to  Import Vouchers from CSV   section in our shop. We guarantee your satisfaction with the choice of just this solution.

With Import Vouchers from CSV you can set up General CSV file settings:

  • setup the char for row delimiter (line)
  • setup the char for col delimiter (elements in line)

And you can set up default voucher settings:

  • setup the default voucher type (discount on order in % / amount, free shipping, etc.)
  • setup the default voucher currency (all currencies in your shop)
  • setup the default voucher value (in % / amount in selected currency)
  • setup the default voucher description (description will be displayed in customer basket)
  • setup the default voucher quantity
  • setup the default voucher quantity per user
  • setup the default value of voucher cumulable (with other voucher codes - true or false)
  • setup the default value of voucher cumulable (with price reductions - true or false)
  • setup the default minimal basket value, from which voucher code will be active
  • setup the default expiry date of voucher code
  • setup the categories to which the discount is to be applied
  • you can upload CSV file into server
  • upload as many CSV files as you want
  • manage uploaded files

And most important:

  • you can upload CSV file into server
  • you can import uploaded CSV file into prestashop voucher database
  • manage colls and rows in CSV file
  • selection of as many CSV file row as you want (row will be added to the database)
  • selection of as many CSV file cols as you want (cols define the voucher specification)

Live preview in back office:
login  :   test@vekia.pl    
Password  :   vouchers


Tutorial of adding many voucher codes in prestashop
In first step you must go to your prestashop back office into the modules section, exactly as shown in the picture:   

In Next step, you can see modules list page. Search module Import Voucher from CSV. If you can't find module try to use search form, type there "Import Voucher". If module exists, click odntooltip cloud with modules full name and icon. (Just like we shown on picture). If module doesnt exists you must to reupload it with module upload form. If you don't have module Import Voucher from CSV, click here to go module product page.

After clicking on tooltip you can click "Configure" to go to the module back office. Modules back office section is a powerful tool for configuring the properties of codes, import files and add codes to your store. Now you can set up the CSV file settings. Type signs of delimiters in your csv file.
In next step configure the voucher properties. Remember that this is not necessary. You can always change these settings, even after loading the file.


Now you can upload CSV file or files (module supports multiple files too) with simple upload form:


after selecting file from disc and click submit, you will see new file in "Uploaded CSV files" section:


Of course you can manage uploaded files. You can delete them in anytime you want. To import voucher codes listed in file you must click "Import to database". After click you will see simple configuration tool, where you can select or deselect vouchers. You can manage columns also. After all you can import vouchers to prestashop database.

How to generate any amount of discount codes in prestashop?


Anyone, who want to add many voucher codes into prestashop noted that this is annoying, tedious and time-consuming procedure. This is because In prestashop we can generate one voucher code per one request. It's problematic, because we spend much time in back office, only for adding voucher codes. Simple measures say that the addition of about 100 discount codes with advanced specification take about 5 hours!  It's ridiculous to spend 5 hours on adding a discount code in prestashop back office. All of this is by the fact that we can't import voucher codes from files in Prestashop back office. But we create a special module:  voucher codes generator for prestashop. With our module you can generate any amount of voucher codes with well-defined specification.


How to generate many voucher codes in prestashop?
For first, we want to write about module Vouchers Generator. This module is the simplest and quickest way to add as many voucher codes as you want by one mouse click! Vouchers module save your time which you can spend to make more money. The solution of which we write, has improved the quality of work in the presatshop administrative environment.


Vouchers Generator features:
- Specify characters of which vouchers can be generated
- You specify how many characters should be used to generate voucher code
- Specify how many unique discount vouchers to generate
- Specify the type of discount voucher (discount rate, a certain amount, free delivery)
- Specify the value of the discount voucher (in percentage or in specified currency)
- Specify how many times the discount voucher can be used
- Specifies how many times any user can use the discount voucher
- Specify the minimum value of the basket, from which the voucher discount will be active
- Available voucher to be used with other discount vouchers
- Available voucher to be used with special sales
- Specifiy a description of the discount voucher that will be visible in shopping cart
- You specify the date from which the voucher discount will be active
- You specify a date after which the coupon discount is no longer valid
- Generate CSV file with generated vouchers and vouchers specification

Live preview in back office:
login  :   test@vekia.pl    
Password  :   vouchers


How to add any amout of voucher codes in Prestashop?
First step you must go to your prestashop back office into the modules section, exactly as shown in the picture:   

Now search the module by search form. In field write "voucher generator" and click for tooltip with module name (exactly the same as we show on picture below). If you don't have module, you can get it here: Voucher codes generator for Prestashop.

After clicking on tooltip, if module isn't istalled click install. If module is already installed click configure to generate any amout of voucher codes in you shop based on Prestashop engine.


Configuration tool is very simple and usefull. We will find there two sections. First section is about generating any amount of voucher codes. Second section is about generated voucher codes - we can download them in CSV file format. You can enlarge picture on right to get more info about how does administration panel of this module looks. For generate voucher codes fill out form in first section, and click on "Generate Vouchers" button. That's all. Now you can go to Payment section and vouchers subsection to get generated voucher codes list.