modules

niedziela, 26 sierpnia 2012

How to reset Prestashop admin password


Reset Prestashop admin password

If you dont remeber your Prestashop admin password and you are still trying to log in into Prestashop back office without effects. This short paper is exactly for you. With this article you will know how to reset your Prestashop admin password. Read this step by step tutorial for reset Prestashop password.


1. Log in into your FTP account
For reset prestashop password you must be able to log in into your Prestashop FTP account. That's important because you'll need access to one file in Prestashop directory described in next step.

2. Check config/settings.inc.php file
Look in config/settings.inc.php file in your Prestashop directory and find out the _COOKIE_KEY_ value. This value in IT nomencalture is called as salt.

3. Log in into your PhpMyAdmin
You must have access to PhpMyAdmin or other database managment system. If you're logged in, try to run the following SQL code and replace the <> variables with values:
<_COOKIE_KEY_> that is salt value from config/settings.inc.php file described in step 2
<yourNewPassword> that is your new password value
<youremailaddress> that is your administrator email address, probably yours ;)

1
UPDATE employee SET passwd = md5(<_COOKIE_KEY_ value><yourNewPassword>) WHERE email =<youremailaddress>”;

That's all. Now you can login into prestashop backoffice.

This article is copied from: How to reset PrestaShop admin password


Prestashop Discount Generator module

sobota, 25 sierpnia 2012


All sites using PHP in CGI mode are affected and your shop can be hacked. All PrestaShop stores are not affected. If you don’t know how PHP is running on your shop, you should still apply this patch for security reasons. When PHP is used in a CGI wrapper, remote attackers may use this solution for command-line switches, such as -s, -d or -c, in a query string that will be passed to the PHP-CGI binary ...

You can read this article in: Prestashop modules and themes site

piątek, 24 sierpnia 2012

How to install modules in Prestashop ? Step-by-step tutorial

Ability to use modules in Prestashop are the most important thing. With the modules created by the Prestashop community (which mean community of normal users, agencies, developers, freelancers etc.) anyone, who use Prestashop e-commerce solution can exted store for new functionalities and features. Professional modules created by agencies or experienced developers are usually paid - you have a guarantee that the module was professionally executed and in compliance with applicable standards, safety rules and other important things in software developing. You can also get free modules, but you have no guarantee that everything will work correctly without compromising the safety of your store.

In this paper you will read about procedure of installing Prestashop modules. I hope, that this article will help you in understanding an essence of installing modules, and will be helply in your first steps with extending functionalities of shop based on Prestashop engine.

How to install prestashop module?

1) Log in into your shop
In first step you must login to your  Prestashop back-office. Remember, only user with granted privileges to access to the modules section can instal, configure and uninstall modules.  Make sure that you log in to the correct account. It would be best if you log in with an administrator account.  I hope, that you remeber your email and password used in installation process ;) 

prestashop backoffice login form by MyPresta.eu

2) Go to "Module" section
If you are already logged in into Prestashop backoffice correctly, now you can go to "Modules" section. Just click in "Modules" position in Administration tabs as we show on the picture below:

select Modules in your prestashop backoffice MyPresta.eu

3) Click on  " Add a new module Add a module from my computer"
In modules section you will see two buttons:  Add a new module Add a module from my computer   |    Add Add a module from PrestaShop addons. Below this two buttons you will see list of modules that are rolled up, by category. After clicking correct button, you will see two simple forms:


As you see, you can add modules in two ways. You can upload module from URL, and upload from your HDD (hard disc drive) or other physical disc.

3) Uploading and install module from URL
To upload module from URL you must have a valid link (URL) which goes to archive with packed module. Paste the correct link into "Module URL" input field and click "Download this module" button. For example we upload our Import vouchers from file in Prestashop module. As you see on image below, when everything is ok, you can find module using search tool. Just write first letters of module name and you will see full name of module in clickable tooltip:


Just click on it and go to 4 step for read about last "installing" procedure.

3) Uploading and install module from your HDD (hard disc drive)
If you downloaded any module into your HDD, you must upload it before you want to install it in your shop. Click on upload form and select correct file (packed) with your module. As in the previous case, we use our module for Importing Discount codes from file in Prestashop. After selecting module from your disc now you can click "Upload this module". Exactly as in previous case, you can find module using search tool. Just write first letters of module name and you will see full name of module in clickable tooltip:


Just click on it and go to 4 step for read about last "installing" procedure.

4) Installing module in your Prestashop
Now you can install module in your shop. This step is the last step in the Prestashop Installation procedure. After clicking on tooltip with your module, you can see new loaded page with your module on list:


On right side of table you can find "Install" button. Click on it to install your module. After that, and if with installation process is everything ok, and module works correctly - instalation is succesfull:


Now you can configure your module or Uninstall it if you don't want to use it. That's all, hope I will help you with this basic Prestashop training

wtorek, 21 sierpnia 2012

How to import livingsocial groupon etc. voucher codes in prestashop


Anyone, who has started an advertising campaign in own online store knows, that voucher codes are awesome tool for increase sales and income. Very often we want to organize actions in other webpages like livingsocial, groupon, mydeal etc. and we get listed special codes form this sites.  Customer after buying there some stuff gets one idividual code from voucher codes list. We must add all of listed vouchers to our shop system, but there is a little problem: what to do when there are hundred of codes on list?

How does it looks in Prestashop system?
In prestashop we can generate one voucher code per one request. It's problematic, because we spend much time in back office, only for adding voucher codes. Moreover, it is really tedious.  Simple measures say that the addition of about 100 discount codes with advanced specification take about 5 hours!  It's ridiculous to spend 5 hours on adding a discount code in prestashop back office. All of this is by the fact that we can't import voucher codes from files in Prestashop back office. But we create a special module:  Import Voucher from CSV  Our module can import a thousand codes listed in some file (CSV or other).

Ok, so how to import many voucher codes in prestashop?
First we need to describe the basic functionality of this module. Module Import Voucher Codes form CSV  is the simplest and quickest way to add as many voucher codes from CSV file as you want by one mouse click! Import Vouchers From CSV module saves your time which you can spend to make more money. If you want this module, go to  Import Vouchers from CSV   section in our shop. We guarantee your satisfaction with the choice of just this solution.

With Import Vouchers from CSV you can set up General CSV file settings:

  • setup the char for row delimiter (line)
  • setup the char for col delimiter (elements in line)

And you can set up default voucher settings:

  • setup the default voucher type (discount on order in % / amount, free shipping, etc.)
  • setup the default voucher currency (all currencies in your shop)
  • setup the default voucher value (in % / amount in selected currency)
  • setup the default voucher description (description will be displayed in customer basket)
  • setup the default voucher quantity
  • setup the default voucher quantity per user
  • setup the default value of voucher cumulable (with other voucher codes - true or false)
  • setup the default value of voucher cumulable (with price reductions - true or false)
  • setup the default minimal basket value, from which voucher code will be active
  • setup the default expiry date of voucher code
  • setup the categories to which the discount is to be applied
  • you can upload CSV file into server
  • upload as many CSV files as you want
  • manage uploaded files

And most important:

  • you can upload CSV file into server
  • you can import uploaded CSV file into prestashop voucher database
  • manage colls and rows in CSV file
  • selection of as many CSV file row as you want (row will be added to the database)
  • selection of as many CSV file cols as you want (cols define the voucher specification)

Live preview in back office:
login  :   test@vekia.pl    
Password  :   vouchers


Tutorial of adding many voucher codes in prestashop
In first step you must go to your prestashop back office into the modules section, exactly as shown in the picture:   

In Next step, you can see modules list page. Search module Import Voucher from CSV. If you can't find module try to use search form, type there "Import Voucher". If module exists, click odntooltip cloud with modules full name and icon. (Just like we shown on picture). If module doesnt exists you must to reupload it with module upload form. If you don't have module Import Voucher from CSV, click here to go module product page.

After clicking on tooltip you can click "Configure" to go to the module back office. Modules back office section is a powerful tool for configuring the properties of codes, import files and add codes to your store. Now you can set up the CSV file settings. Type signs of delimiters in your csv file.
In next step configure the voucher properties. Remember that this is not necessary. You can always change these settings, even after loading the file.


Now you can upload CSV file or files (module supports multiple files too) with simple upload form:


after selecting file from disc and click submit, you will see new file in "Uploaded CSV files" section:


Of course you can manage uploaded files. You can delete them in anytime you want. To import voucher codes listed in file you must click "Import to database". After click you will see simple configuration tool, where you can select or deselect vouchers. You can manage columns also. After all you can import vouchers to prestashop database.

How to generate any amount of discount codes in prestashop?


Anyone, who want to add many voucher codes into prestashop noted that this is annoying, tedious and time-consuming procedure. This is because In prestashop we can generate one voucher code per one request. It's problematic, because we spend much time in back office, only for adding voucher codes. Simple measures say that the addition of about 100 discount codes with advanced specification take about 5 hours!  It's ridiculous to spend 5 hours on adding a discount code in prestashop back office. All of this is by the fact that we can't import voucher codes from files in Prestashop back office. But we create a special module:  voucher codes generator for prestashop. With our module you can generate any amount of voucher codes with well-defined specification.


How to generate many voucher codes in prestashop?
For first, we want to write about module Vouchers Generator. This module is the simplest and quickest way to add as many voucher codes as you want by one mouse click! Vouchers module save your time which you can spend to make more money. The solution of which we write, has improved the quality of work in the presatshop administrative environment.


Vouchers Generator features:
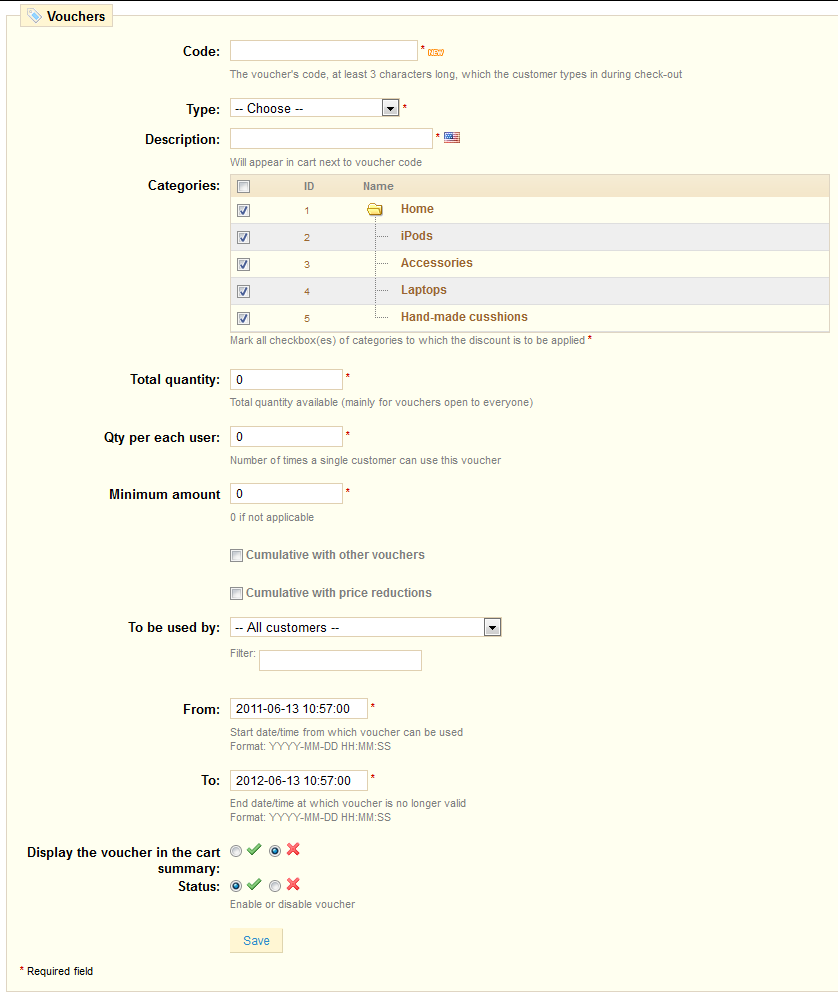
- Specify characters of which vouchers can be generated
- You specify how many characters should be used to generate voucher code
- Specify how many unique discount vouchers to generate
- Specify the type of discount voucher (discount rate, a certain amount, free delivery)
- Specify the value of the discount voucher (in percentage or in specified currency)
- Specify how many times the discount voucher can be used
- Specifies how many times any user can use the discount voucher
- Specify the minimum value of the basket, from which the voucher discount will be active
- Available voucher to be used with other discount vouchers
- Available voucher to be used with special sales
- Specifiy a description of the discount voucher that will be visible in shopping cart
- You specify the date from which the voucher discount will be active
- You specify a date after which the coupon discount is no longer valid
- Generate CSV file with generated vouchers and vouchers specification

Live preview in back office:
login  :   test@vekia.pl    
Password  :   vouchers


How to add any amout of voucher codes in Prestashop?
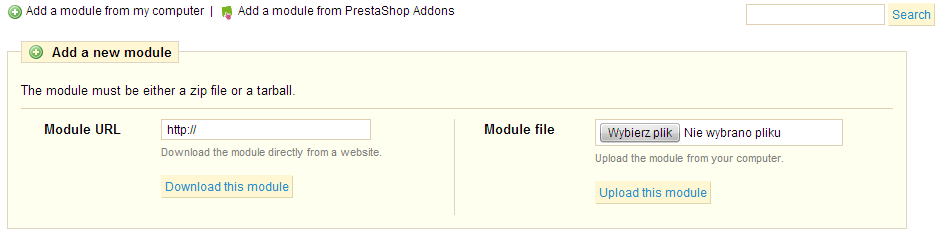
First step you must go to your prestashop back office into the modules section, exactly as shown in the picture:   

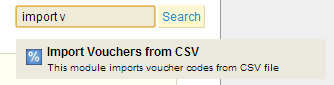
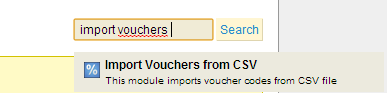
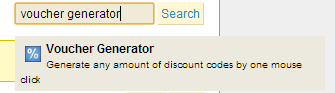
Now search the module by search form. In field write "voucher generator" and click for tooltip with module name (exactly the same as we show on picture below). If you don't have module, you can get it here: Voucher codes generator for Prestashop.

After clicking on tooltip, if module isn't istalled click install. If module is already installed click configure to generate any amout of voucher codes in you shop based on Prestashop engine.


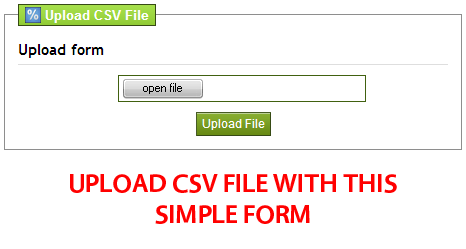
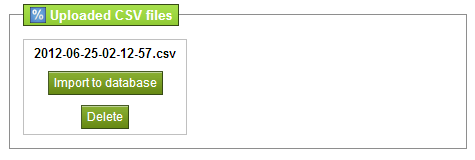
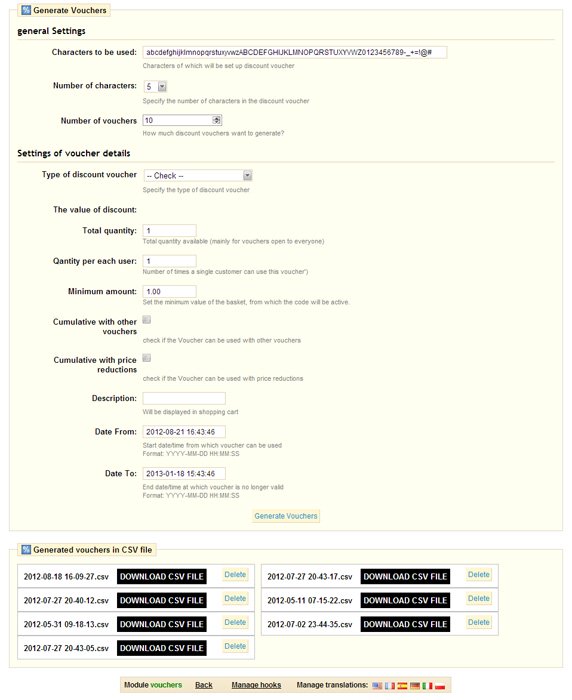
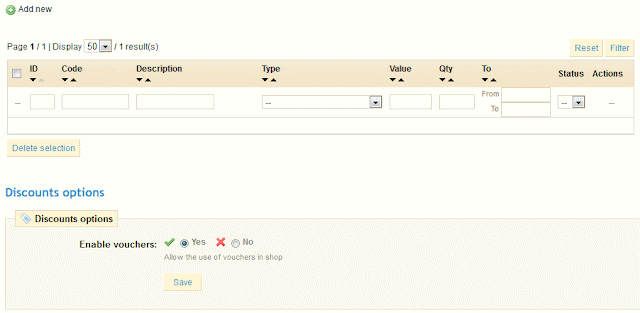
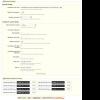
Configuration tool is very simple and usefull. We will find there two sections. First section is about generating any amount of voucher codes. Second section is about generated voucher codes - we can download them in CSV file format. You can enlarge picture on right to get more info about how does administration panel of this module looks. For generate voucher codes fill out form in first section, and click on "Generate Vouchers" button. That's all. Now you can go to Payment section and vouchers subsection to get generated voucher codes list.

niedziela, 19 sierpnia 2012

How to add voucher codes in prestashop?

Anyone who want to start an advertising campaign in own online store knows, that discount codes for customers are awesome tool for increase sales. You can usually add to your shop as many voucher codes for clients as you exactly want. Prestashop engine also has got discount codes feature. So, how we can add codes into our shop? It's really simple, check our tutorial, in which you will learn how to add discount codes in your shop based on Prestashop engine.

1) Login Into your prestashop back office

"The PrestaShop back-office is the name used to describe the administration panel of your PrestaShop site in this user-guide. You will spend most of your time in this panel, as everything that the user sees is handled directly through the back-office: adding/editing/removing products, handling carriers, building packs, creating vouchers, keeping contact with customers, improving your shop, etc.Source: Prestashop User Guide

Prestashop Back office, source: prestashop user guide
Go to your Prestashop administration page and login into your back office administration (or worker) account. If you are worker (not shop admin) make sure that admin grant you access for payment section. If you are the shop administrator, you don't care about that :)
For login you just must Type your email and password that you set in installation process of your shop (administration account)


2) Go to payment section and Vouchers subsection

"In the "Vouchers" tab, you can give your customers discounts (by value or by percent) or offer free shipping on their orders. Under this tab are all of the previously created vouchers, along with their status of validity.Source: Prestashop User Guide
You will see something like that: 


That is a list of voucher codes already defined in your shop. For first, check the Enable Vouchers, it must be set to Yes. If you want to turn off voucher codes in your shop, set this option to "No" :)

3) Adding a voucher code into your shop

For add new voucher, click "+ Add new" button.
you will see something like that:


  • Give it a unique code. You can either create one manually (and therefore use readable words, like 1VOUCH4JOE), or have PrestaShop generate one unique string by clicking the "New" button. Of course, you can also use another string generator (such as random.org's). You can use up to 32 characters.
  • The "Type" field enables you to choose the method of the applied discount:
    • Discount on order (%). The voucher applies to a percentage of the order total. For instance, let's say the order is valued at $200 before taxes. The voucher has a value of -15%. When applying this coupon the customer will only have to pay $170 before taxes.
    • Discount on order (amount). This choice is applied to a monetary discount on the entire order. For instance, let's say the order is valued at $100 before taxes. The discount offers $20 off the purchase. By using the discount the customer pays only $80 before tax.
    • Free shipping. With this discount, you can treat your customers to free shipping. They can use the code when paying and it will apply to their offer.
  • Choose the voucher's behavior – meaning how it should behave when the order's amount is less that the voucher's:
    • reduce the voucher to the total order amount: do this if you want vouchers to be used only once.
    • create a new voucher with the remaining amount: do this if your customers can use their voucher's value for as long as it has some.
    • create a negative invoice: do this if you want vouchers to be used only once, but you still need to know the final value for your accounting book. The user won't receive any kind of further voucher or discount.
  • Give it a proper description, in every languages that your shop supports (click on the flag to change language). Customers will be able to read this, so write a proper sentence.
  • Indicate which categories the voucher applies to – because sometimes you'd rather have customers not use vouchers for certain products.
  • Set a quantity of available vouchers: either "1" if it is intended for a single customer, or any number if the voucher is for whoever uses one first.
  • You can set the number of times a voucher can be used. That number must be at least equal to the quantity of available vouchers.
    • If that number is inferior to the total quantity of available vouchers, then one single customer won't be able to use all of them.
    • Keeping it to "1" makes sure that each of your customers can only the voucher once. In that case, make sure the voucher applies to a group rather than a customer...
  • Set a minimum amount under which the voucher is not applicable. Your voucher will only be applicable if the customer's order is above the given amount.
  • You can choose whether or not the vouchers are allowed to be used with other promotions on your products or other vouchers. Make your preferences known by ticking the checkboxes.
  • The "To be used by" field enables you to restrict your voucher to only one of your customers. For instance, if you had a delivery delay and you want to apologize, you can create a voucher for this customer that only he or she can access. To quickly find the customer, type in the first few letters of their First or Last name in the "Filter" field.
  • The voucher can have a time limit (for instance, a discount for launch week). Click the "From" and "To" fields in order to choose your dates using the calendar. By default, a new voucher lasts a year.
  • You can decide whether the voucher should be shown in the cart summary or not. Do this if you want to inform a customer that they can use a voucher. If you'd rather not push for the voucher's usage, then do not show it.
  • Finally, the "Enable" field allows you to enable or disable the vouchers.
Once everything has been saved, you can send your voucher to your customers.

As you see, adding new voucher into your shop is very simple but it takes a lot of time...